on
Zero to Om - Act 3
In this third post we’ll take a look at how the app is initialized and rendered. The source code can be found on GitHub.
Note: I strongly recommend reading the previous post first if you haven’t done so already.
For increased comprehension we will jump through the two files and not go through them from top to bottom.
The State
Most applications, at least the interesting ones, have some kind of state. In our case we are storing two data points:
- a collection of todos
- a view filter (i.e. “All”, “Active” or “Completed”)
The exciting thing about Om is that we put all of the state into exactly one place:
(def app-state (atom {:showing :all :todos []}))
The symbol app-state binds to an atom of a map: the view filter (showing) is set to ‘all’ and the todos are an empty collection.
As you see, a map can be defined by curly brackets: {key1 val1 ... keyN valN} (good to know: an uneven number of elements results in a compiler error). Optionally, you could just set a , between pairs since a comma is treated as whitespace in Clojurescript.
An atom is a so-called reference value, meaning that it basically points to immutable data. Why couldn’t we just use a simple symbol and make it point to new data after a change? Well, an atom has the ability to register watchers when you change its value with swap! (or reset!). Om leverages this to re-render components on a change of state.
By pushing all of the application state to the edges of the system, the rest of the code remains functional since there is only a single mutable object now. Putting the state in one specific place reduces complexity and is therefore much easier to reason about.
The Root
Now we’ll meet Om for the first time! Finally, huh? So first we need to load it:
(ns todomvc.app
  (:require [om.core :as om :include-macros true]
            [om.dom :as dom :include-macros true]
            [...])
Macros - since they are a special kind of function - cannot be loaded with the standard require but through require-macros. However, if macros are in the same namespace - as in this case - adding :include-macros true has the same effect.
To start the app we need to use the function om/root and tell it
- (a) what to render,
- (b) what our state is,
- (c) and where to hook into the DOM.
(om/root
  todo-app                                           ;; (a)
  app-state                                          ;; (b)
  {:target (.getElementById js/document "todoapp")}) ;; (c)
Om will take it from here. It starts a rendering loop and when the state changes it will update the components in a single batch (very efficiently by leveraging the browser’s requestAnimationFrame).
Now to the burning question: What is todo-app ?
Component ‘todo-app’
todo-app is a function that takes two parameters: the state and the underlying React component owner (which Om creates for you).
(defn todo-app [{:keys [todos] :as state} owner]
  ;; ...
)
You might be wondering why the first parameter looks so odd. This is a powerful feature of ClojureScript at work: destructuring. It basically lets you bind symbols to parts of a data structure. In this case [:keys [todos]] is a shortcut for [todos :todos] - both bind the value of the key todos from the state to the symbol todos. The :as is optional and allows to define an alias for the entire structure, state in this case. If you want to learn more about this, I recommend reading Clojure: Destructuring.
Let’s have a look at the function’s body:
(defn todo-app [{:keys [todos] :as state} owner]
  (reify
    om/IRender
    (render [_]
      ;; create DOM elements ...
    )
The first thing you’ll notice is reify. It evaluates to a new object that implements all specified protocols. A protocol is “a named set of named methods and their signatures”.
Here the om/IRender protocol is implemented. It has a render function which - obviously - renders the component to HTML. It is called by Om whenever it detects a change in the component’s state. Note: The first parameter is the instance of the component itself, it is ignored with _ since it is not needed.
There are several protocols in Om that map more or less directly to React’s life cycle steps:
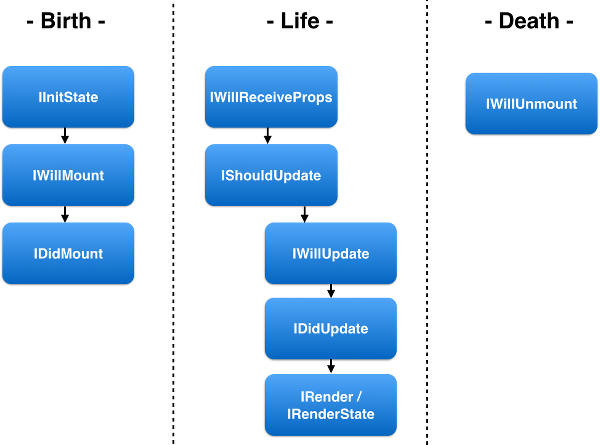
Basically there is:
- a creation phase (“birth”) which can be used to do initialization work,
- an updating phase to react to state changes & render the component,
- and a cleanup phase (“death”).
The only protocol you should never ever try to implement is IShouldUpdate since this is where Om really shines: it runs a comparison between old and new state in order to decide whether to re-render the component or not. And since the data structures in ClojureScript are immutable it only requires a simple equality check - which is insanely fast compared to React’s expensive piece by piece comparision. This is the main reason why Om currently crushes pure React.js applications in benchmarks.
Let’s get back to the render function from above:
(dom/div nil
  (header)
  (dom/input
    #js {:id "new-todo" :ref "newField"
         :placeholder "What needs to be done?"
         :onKeyDown #(enter-new-todo % state owner)})
  (listing state)
  (footer state)))))
It creates the actual DOM elemens with the help of Om’s om.dom namespace imported earlier. These DOM functions map directly to React’s DOM API, meaning that dom/div becomes React.DOM.div and has the same parameters:
props, a JavaScript object that modifies the component’s output/behaviour- all other (optional) parameters are children components
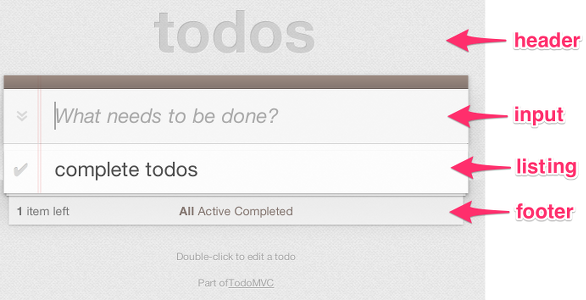
In this case, the root element has four children: an input field as well as a header, a list and a footer - just three functions. As you can see, nil is used if there are no props.
Let’s have a closer look at the text input:
(dom/input
  #js {:id "new-todo"
	   :placeholder "What needs to be done?"
       :onKeyDown #(enter-new-todo % state owner)})
As we have seen before, props sets an id and placeholder value which will be rendered as HTML tag attributes. onKeyDown registers an event handler that fires after the user pressed a key - calling the enter-new-todo with the event, state and owner.
Note: #(...) is a function literal. Basically it’s a short version of (fn [evt] (enter-new-todo evt state owner)). So % is the function’s first parameter, %2 the second and so on.
Going back to render from above, the functions header and footer are not particularly interesting - let’s have a look at listing instead:
(defn listing [{:keys [todos showing editing] :as state}]
  (dom/section #js {:id "main" :style (hidden (empty? todos))}
    (dom/input
      #js {:id "toggle-all" :type "checkbox"
           :onChange #(toggle-all % state)
           :checked (every? :completed todos)})
    (apply dom/ul #js {:id "todo-list"}
	  (list-items todos showing editing))))
The list of todos is wrapped in a <section> with the id main. It is hidden when there are no todos (by using the hidden utility function we saw last the time). Inside we find a checkbox which is checked only if every todo item is marked ‘completed’. On change it invokes the toggle-all event handler. Furthermore an <ul> element is created and renders the children that it receives from the list-items function.
Note: The apply function - comparable to the correspondent JavaScript function - is necessary to convert the sequence of components from list-items to individual function parameters of dom/ul.
(defn list-items [todos showing editing]
  (om/build-all item/todo-item todos
	{:key :id
	 :fn (fn [todo]
           (cond-> todo
		     (= (:id todo) editing)        (assoc :editing true)
		     (not (visible? todo showing)) (assoc :hidden true)))}))
list-items uses Om’s build-all function to create a sequence of a component, in this case todo-item. The second parameter is a sequence of state each component receives, here it is todos. And the third parameter is a map of options:
:keyis a keyword used to look up a value in the state which will serve as a React key (idin our case). This makes rendering more efficient since upon re-rendering React knows which DOM node belongs to which sequence element.:fnis a function to apply to the state before rendering it. The employed function uses the funky lookingcond->macro which threads the expressiontodothrough the given pairs of forms. Firstly, it adds the flageditingto any todo which has the same id as the one being edited right now (if any). Secondly, it adds the flaghiddenif the completion state of the item does not match theshowingview filter (using the utility functionvisible?).
Now, let’s have a look at the todo-item component.
Component ‘todo-item’
(defn todo-item [todo owner]
  (reify
    om/IInitState
    (init-state [_]
      {:edit-text (:title todo)})

	om/IRenderState
    (render-state [_ state]
      (let [class (cond-> ""
                    (:completed todo) (str "completed")
                    (:editing todo)   (str "editing"))]
        (dom/li
          #js {:className class :style (hidden (:hidden todo))}
          (dom/div
            #js {:className "view"}
            (dom/input
              #js {:className "toggle" :type "checkbox"
                   :checked (and (:completed todo) "checked")
                   :onChange #(complete todo)})
            (dom/label
              #js {:onDoubleClick #(edit % todo owner)}
              (:title todo))
            (dom/button
              #js {:className "destroy"
                   :onClick #(destroy todo)}))
          (dom/input
            #js {:className "edit"
                 :value (om/get-state owner :edit-text)
                 :onBlur #(submit % todo owner)
                 :onChange #(change % todo owner)
                 :onKeyDown #(key-down % todo owner)}))))))
This looks pretty complex but it is actually quite simple. The render from IRenderState has an additional parameter compared to IRender: the state. It creates a li tag with two children: a div #view and a text input #edit. Depending on the value of class - which is constructed by cond-> - one of them is displayed.
Inside the view div a checkbox (to mark the item as completed), a label (to display the todo) and a button (to destroy it) are added. The declared event handlers are basically self-explanatory.
The component also implements the IInitState protocol: init-state returns a map containing the component’s initialized local state. This is different from the global or passed-in state since it is usually just transient, component-specific information. In the text input you can see it being read with om/get-state. We don’t use the todo’s title directly since the user might abort during editing and then we would have lost the original value. edit-text is simply a temporary title.
That’s it for now, kids! In Act 4 we’ll see how the user can interact with the application.
comments powered by Disqus